
Chelsea see off Southampton in a late home win - Tactical Analysis
The Blues claimed all three points in a late win against Southampton. Chelsea found an early lead in the first half. After the break, Southampton equalised before being reduced to 10 men. With 5 minutes to spare minutes, Werner put the hosts ahead before Chilwell made it 3-1.

EPL 2021/2022 GW7: Chelsea 3 - 1 Southampton
Chelsea 3
(Chalobah 9, Werner 84, Chilwell 89)
Southampton 1
(Ward-Prowse 61)
After two consecutive losses, The Blues claimed all three points in a 3-1 late win against Southampton and got the top of the table heading into the international break.
Trevoh Chalobah featured in the starting 11 and unlocked the game from a set-piece for the early lead. The first-half lead would have been larger if Timo Werner's celebration hadn't been interrupted by VAR intervention to rule out his goal.
After the break, Southampton started with higher urgency and Ralph Hasenhuttl reshaped the team to match Chelsea's system. Despite a scare culminated in James Ward-Prowse's equaliser from the penalty spot, the game turned around for The Blues when The Saint's skipper got sent off for a late tackle on Jorginho.
The sending off was the turning point, and it was again Werner, who put Chelsea ahead with 5 minutes to spare before Ben Chilwell put the icing on the cake to make it 3-1.
There were some interesting tactical adjustments from the two managers. Let's analyse them closely.
⚽ In Possession
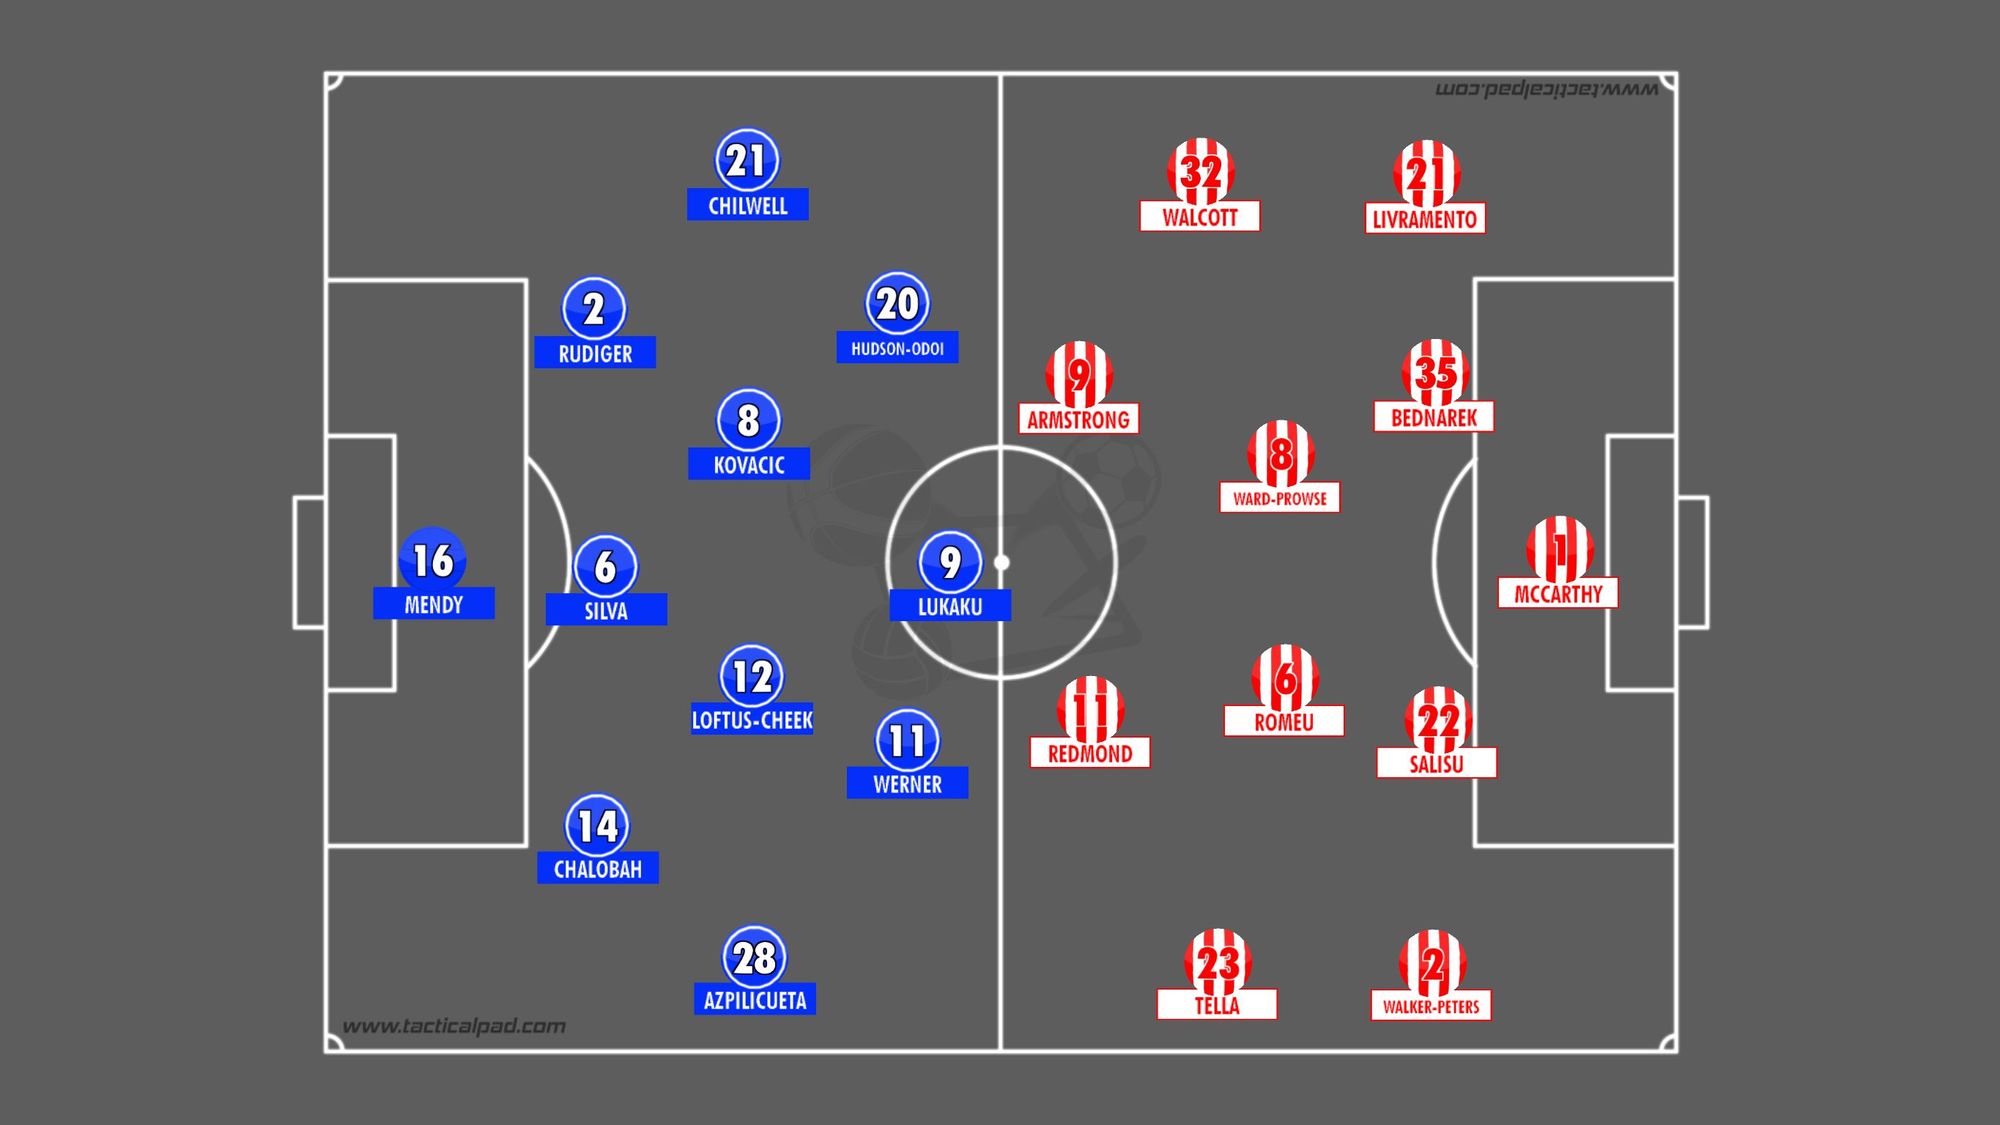
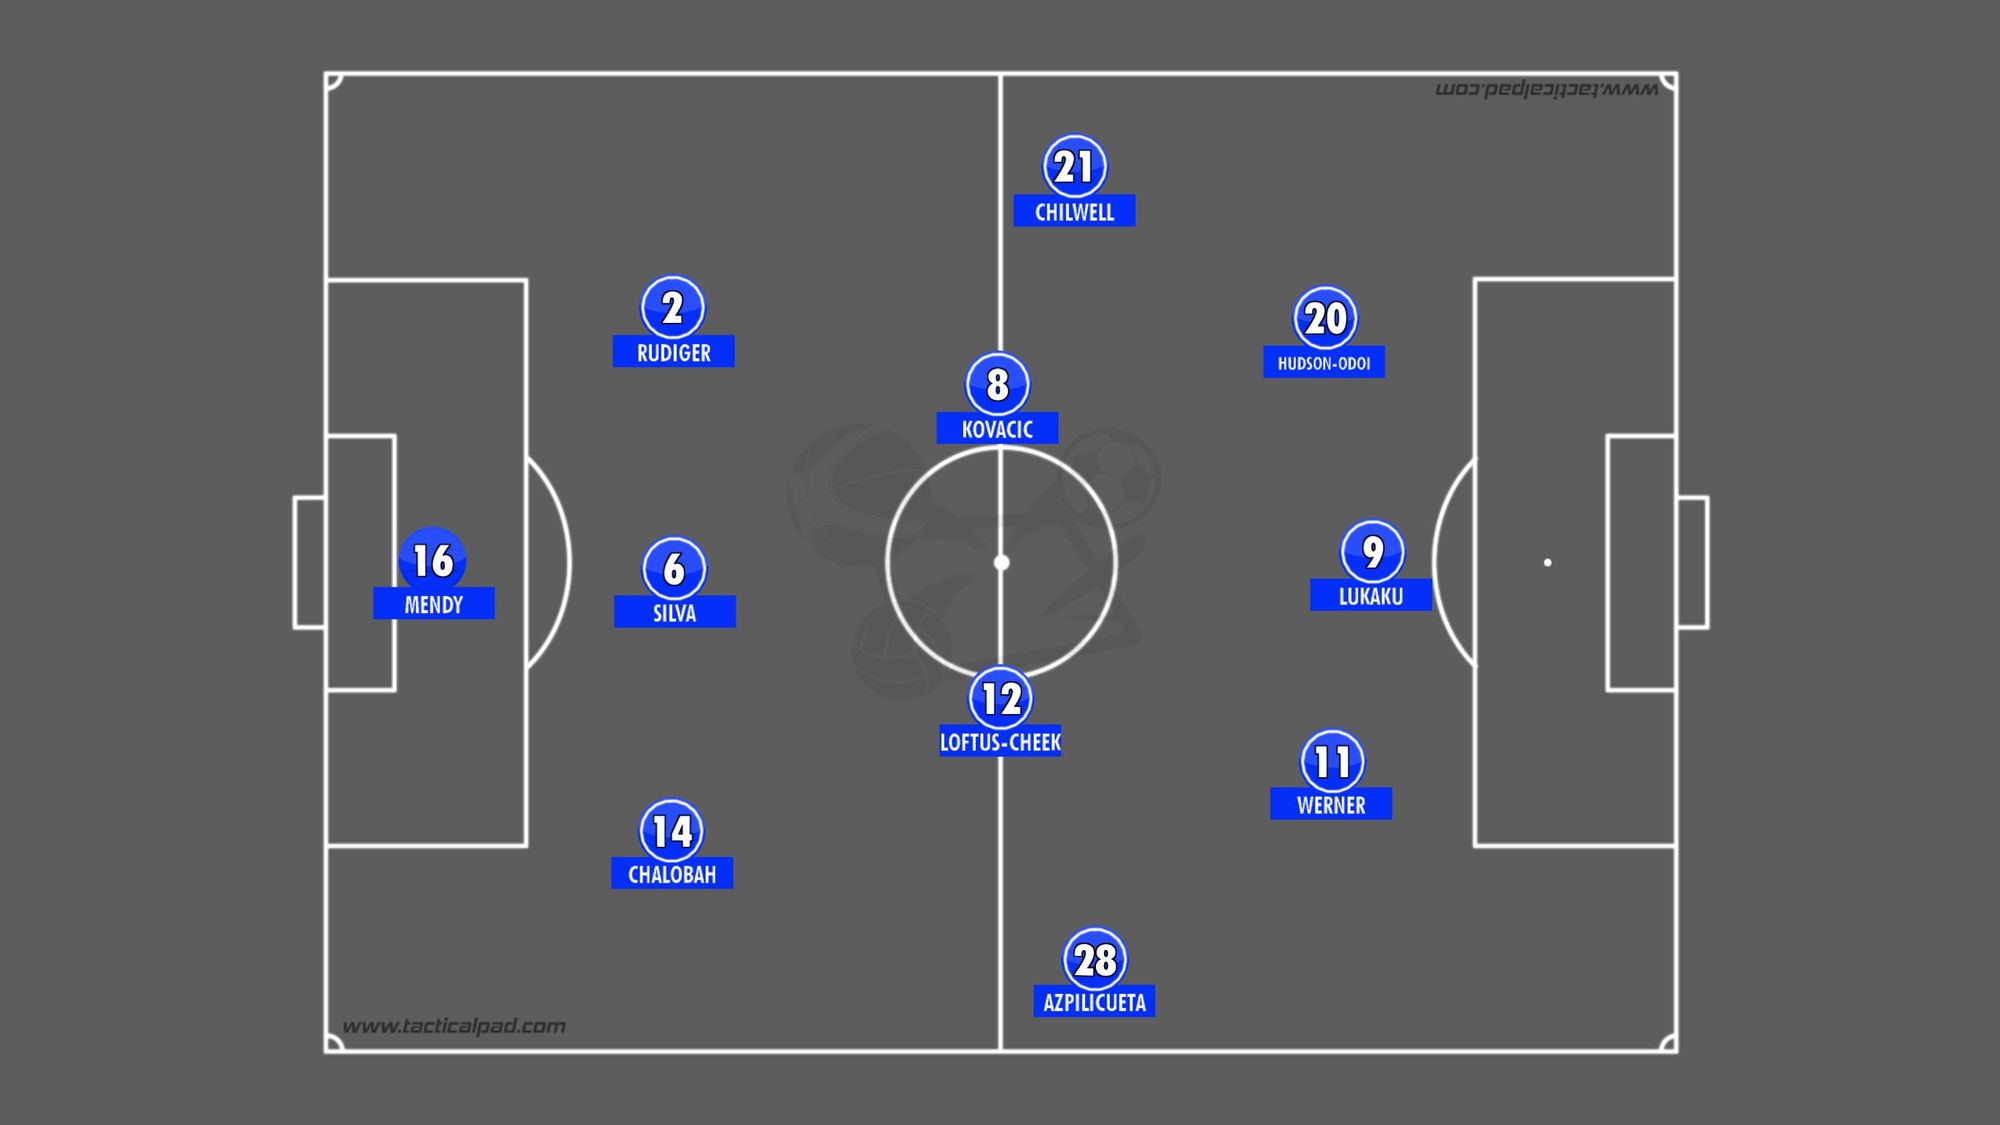
After a brief spell of games where Thomas Tuchel adopted a slightly different shape, the German went for his most consolidated system this time. With the ball, the hosts played in a 3–4–3 with Chilwell and Callum Hudson-Odoi both starting the game on the left flank, as a wing-back and as a wide forward respectively.
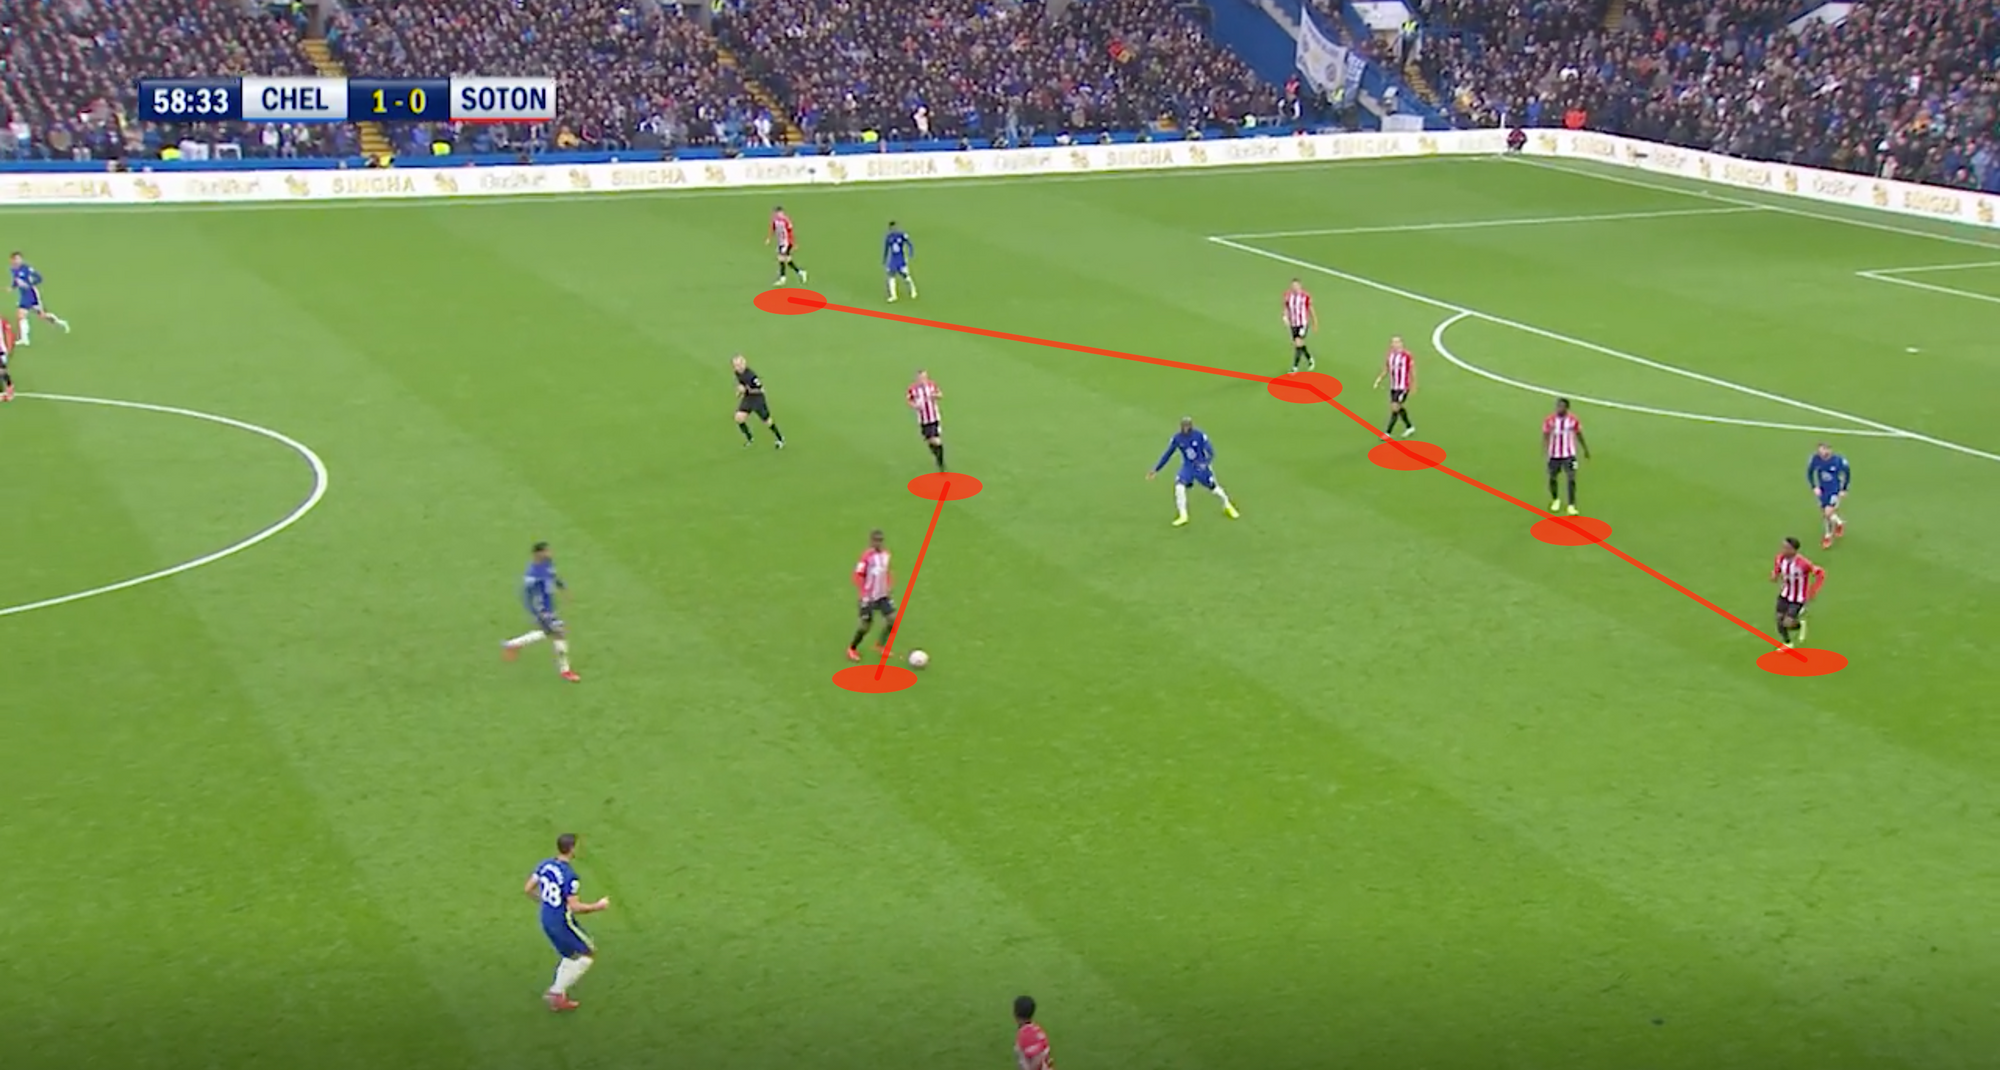
Southampton approached the game with a high man-to-man pressing structure in an effort to disrupt Chelsea's build-up phase.
To bypass the first line of pressure, Chelsea's out-ball was either to the wing-backs, who would exploit the 2v1 on the flank or to Romelu Lukaku, who would retain the ball and link up with Werner and the midfield.
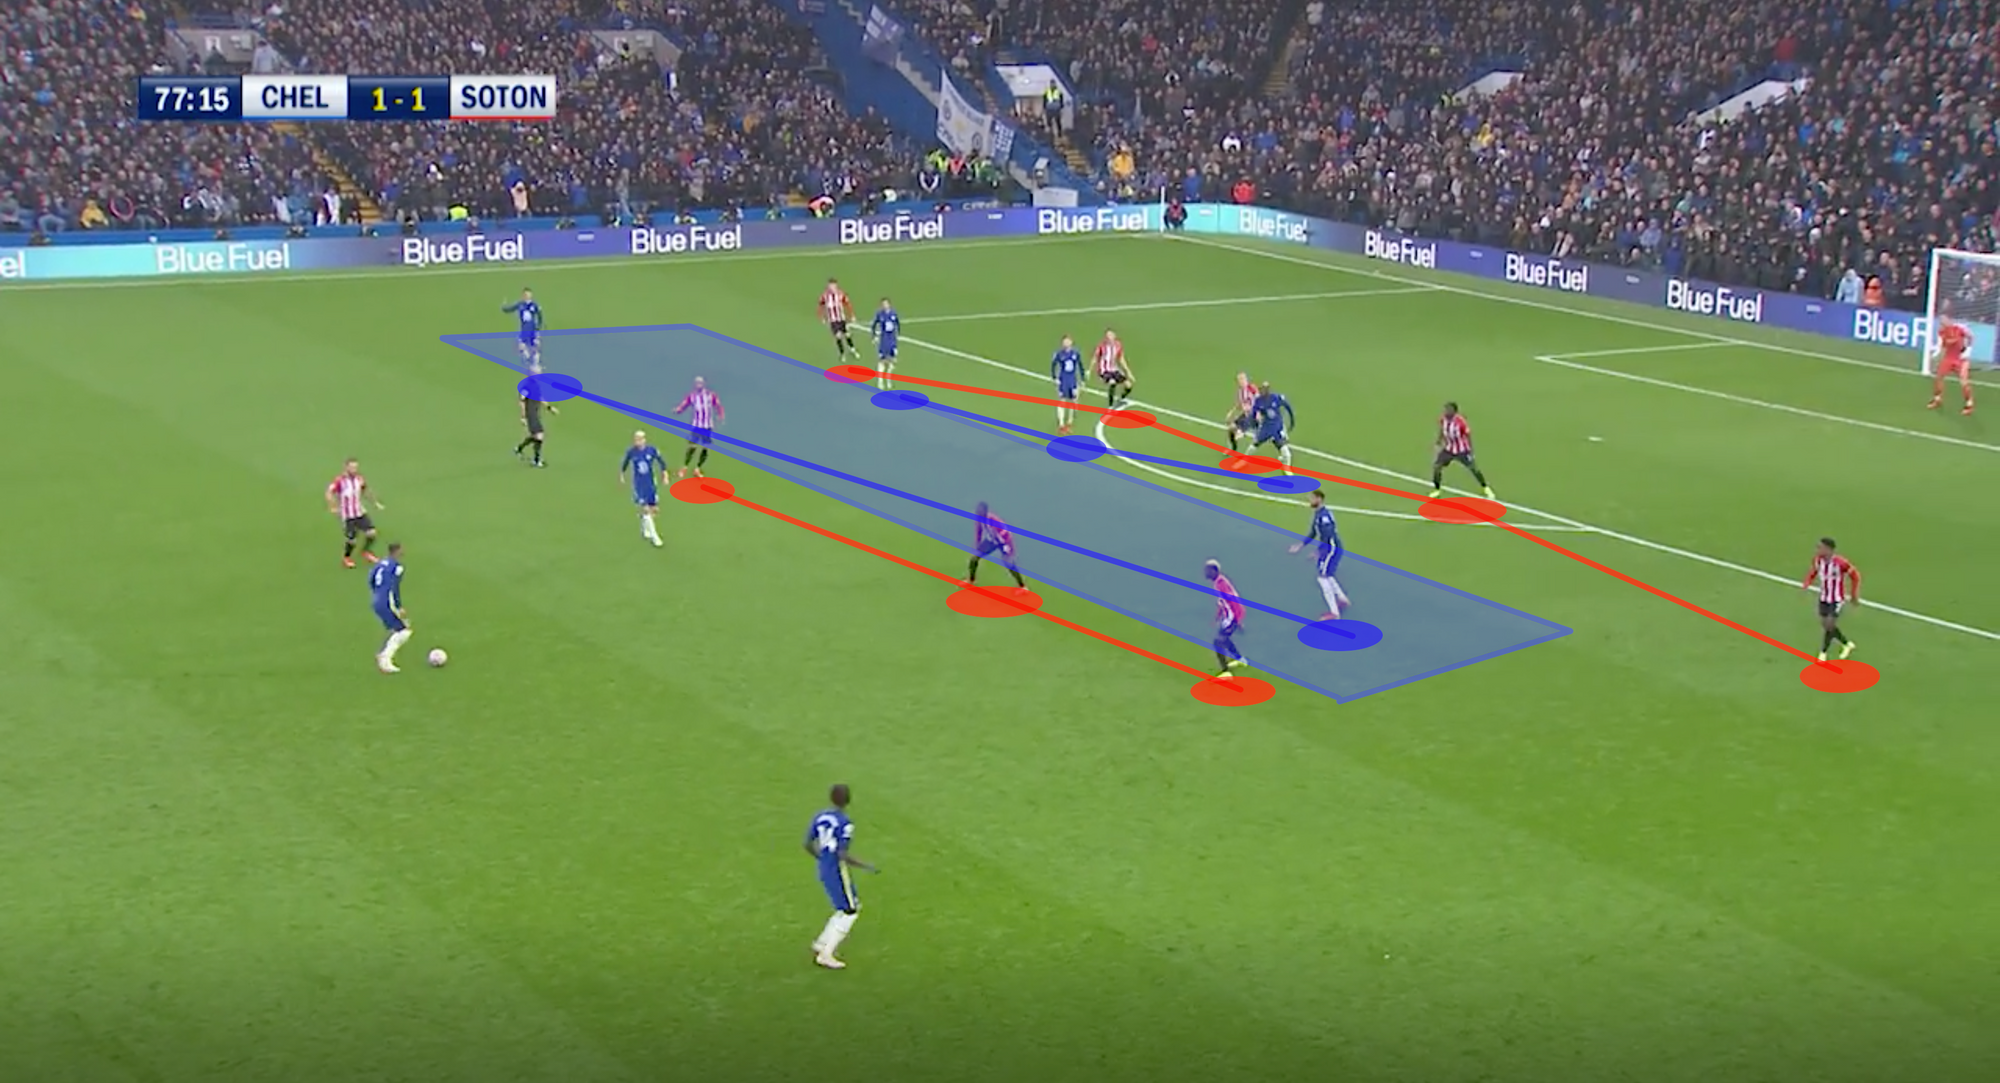
Chelsea's strategy was about moving the ball from deep, attract the visitor's pressing line high on the pitch, then bypass the pressure with long balls to cut out the midfield or exploit the overload on the flanks. This recurring theme was exploited by The Blues with discrete success during the first period of the game.
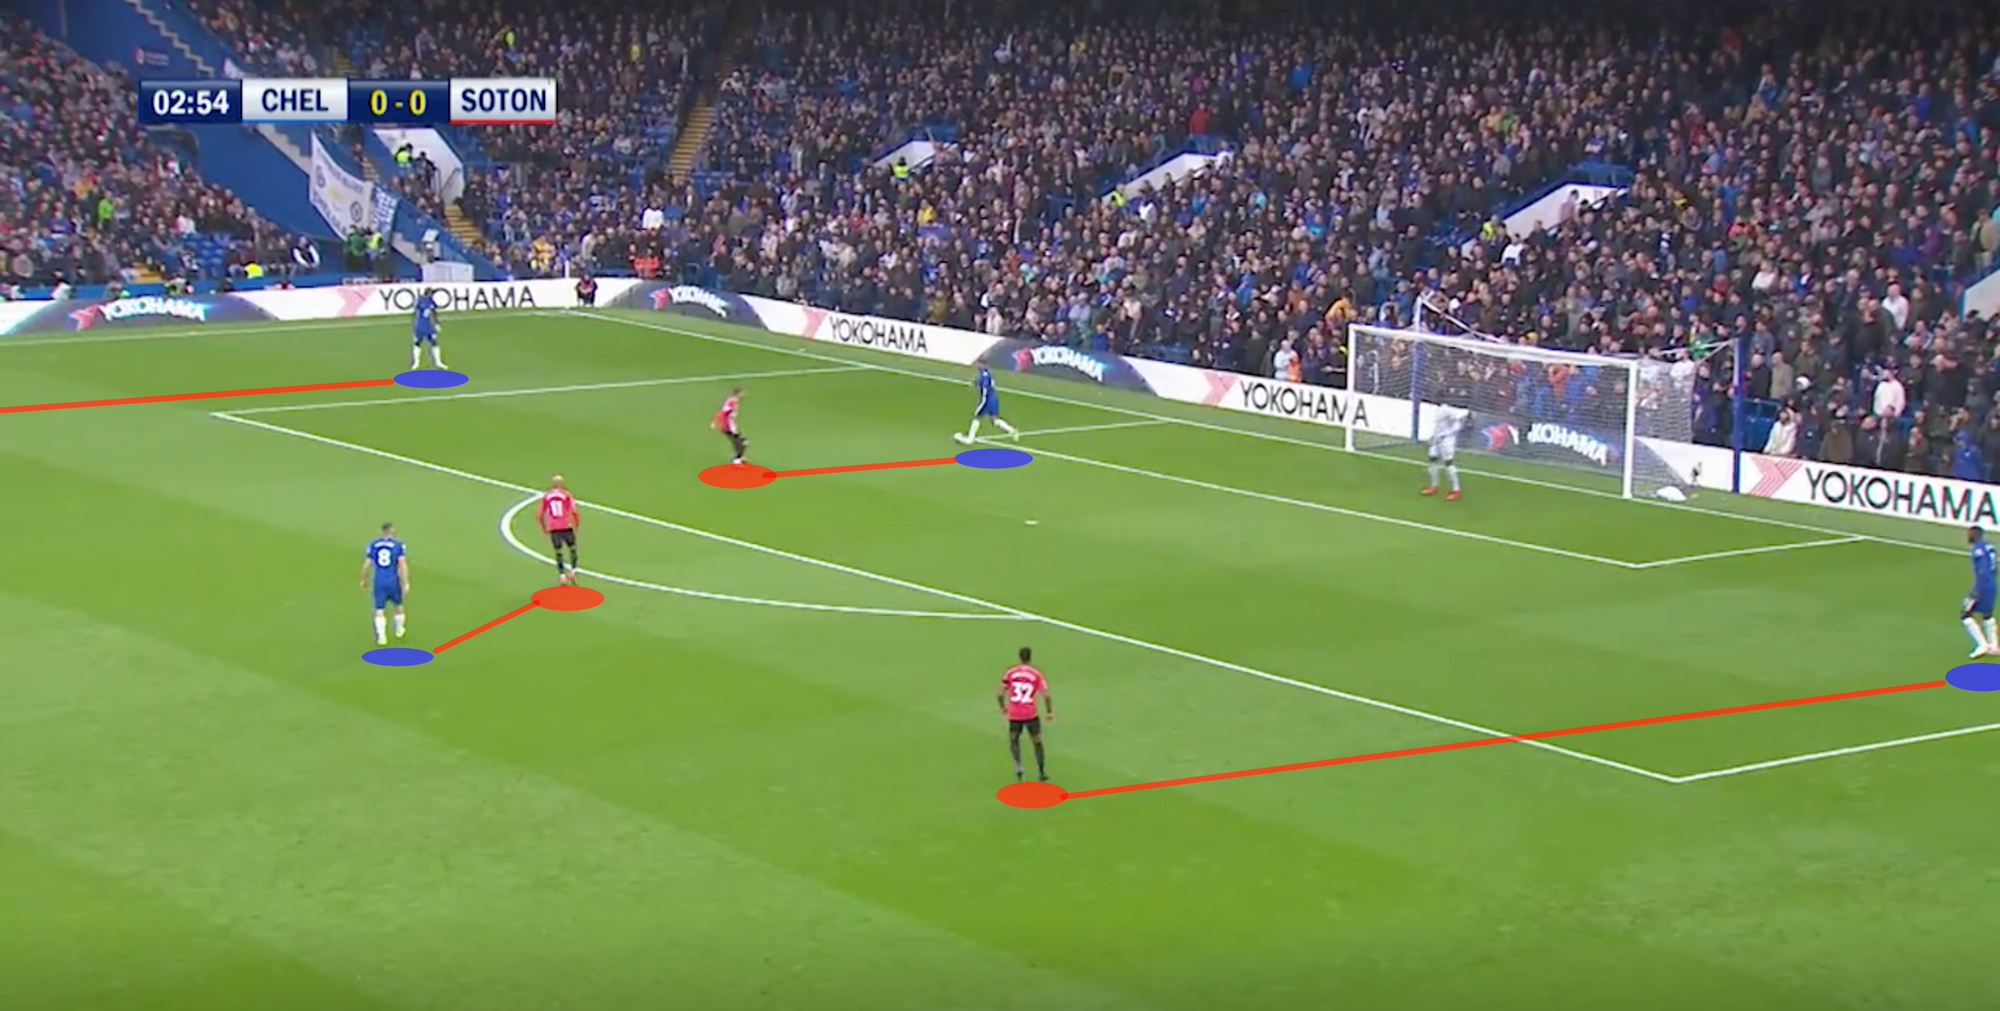
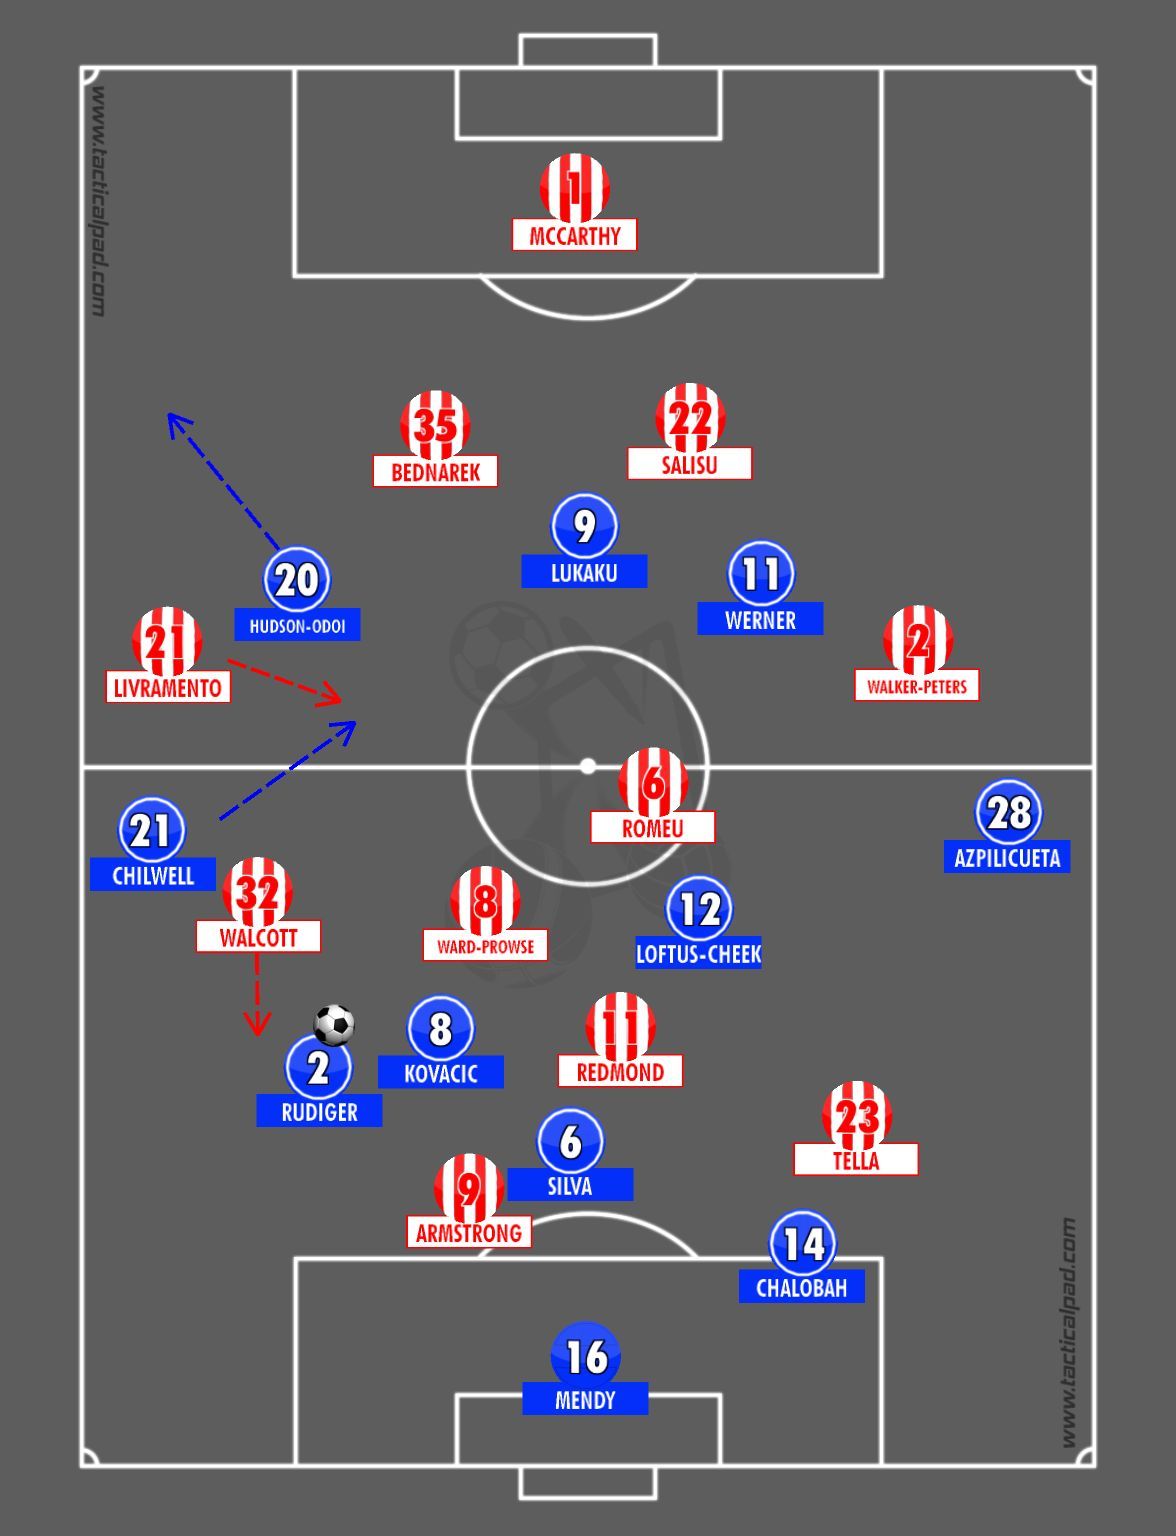
Here is a sketch of how Antonio Rudiger attracted the pressure before Edouard Mendy bypassed the midfield with a long ball to Lukaku. The Belgian then offloaded it to Mateo Kovacic, who offered the ball on the run for Cesar Azpilicueta with plenty of free space on the flank.
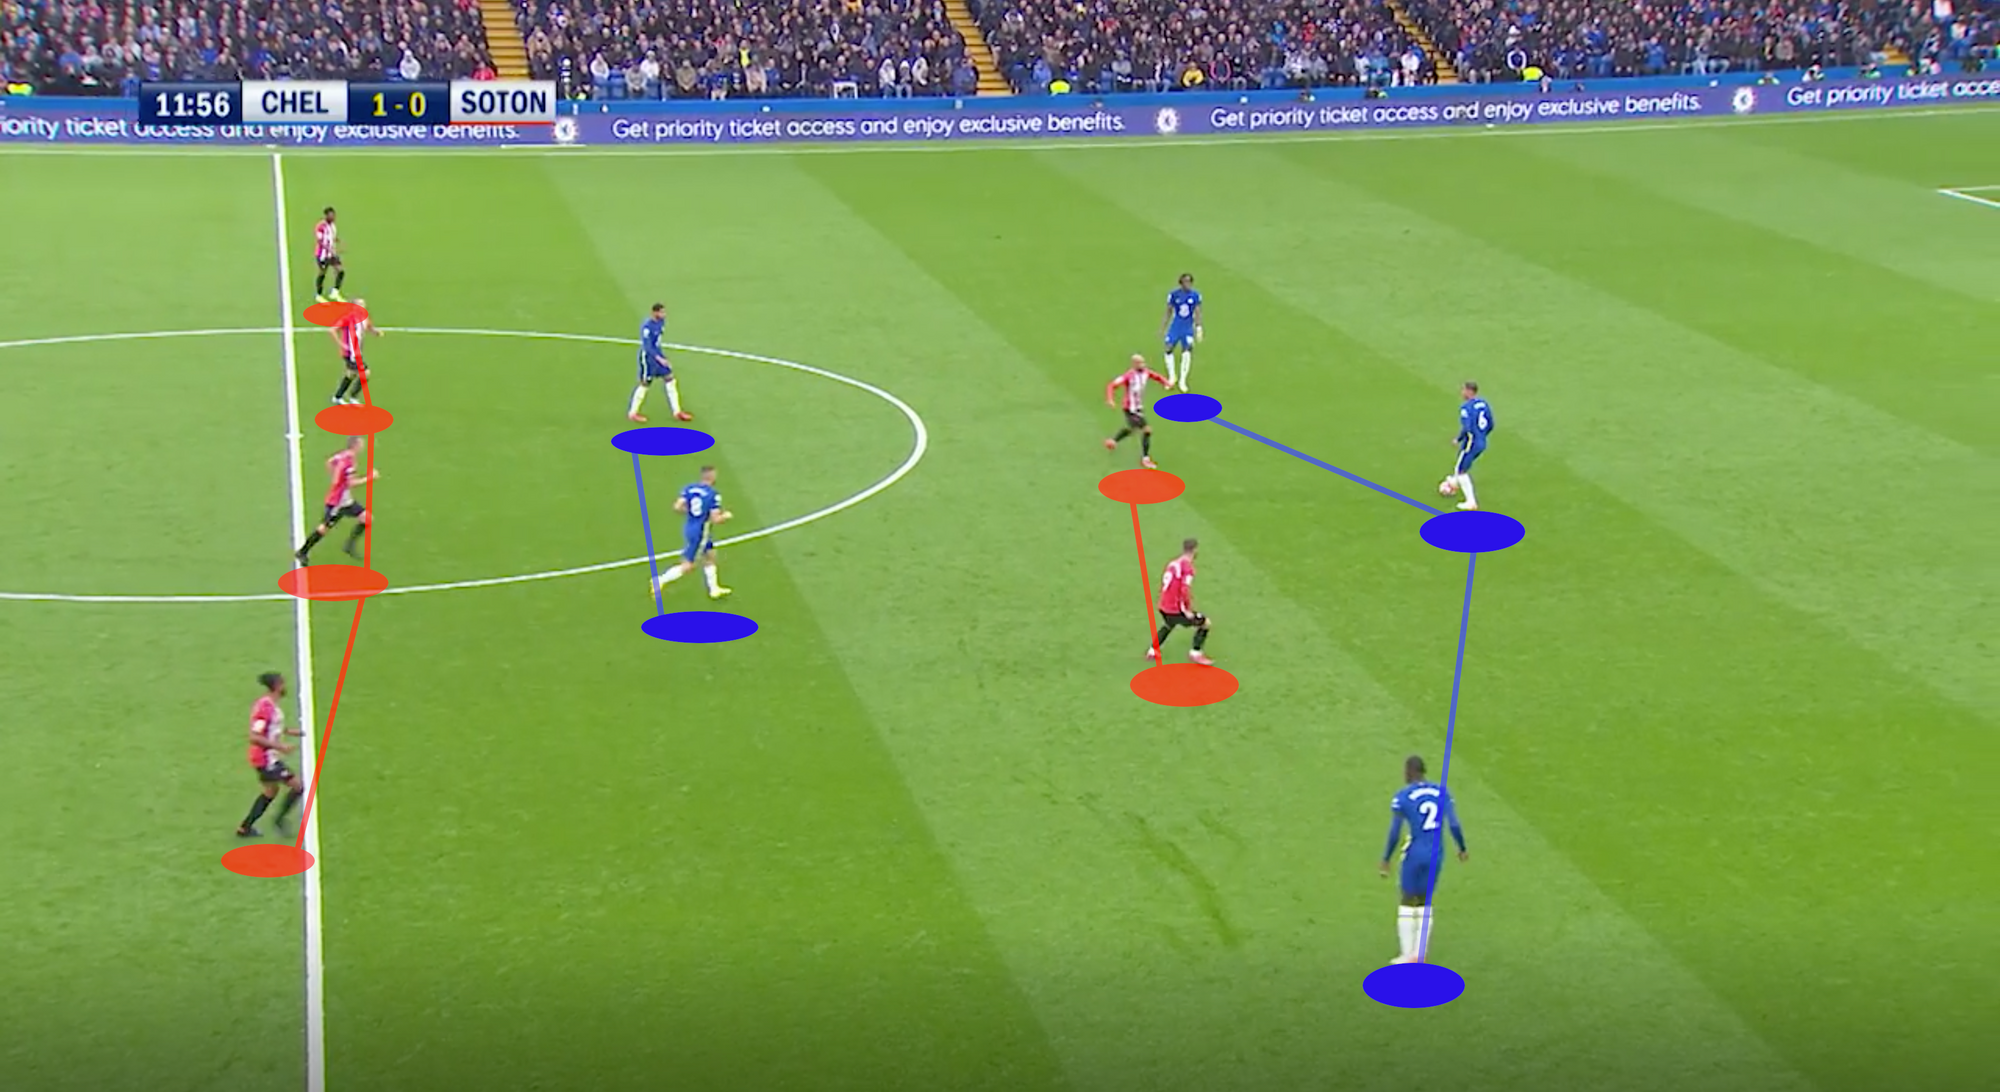
In particular, Ward-Prowse was part of the visitor's high pressing line, and when bypassed by long balls, he found himself too late to double up on Lukaku and not able to effectively track the hosts' midfielders.
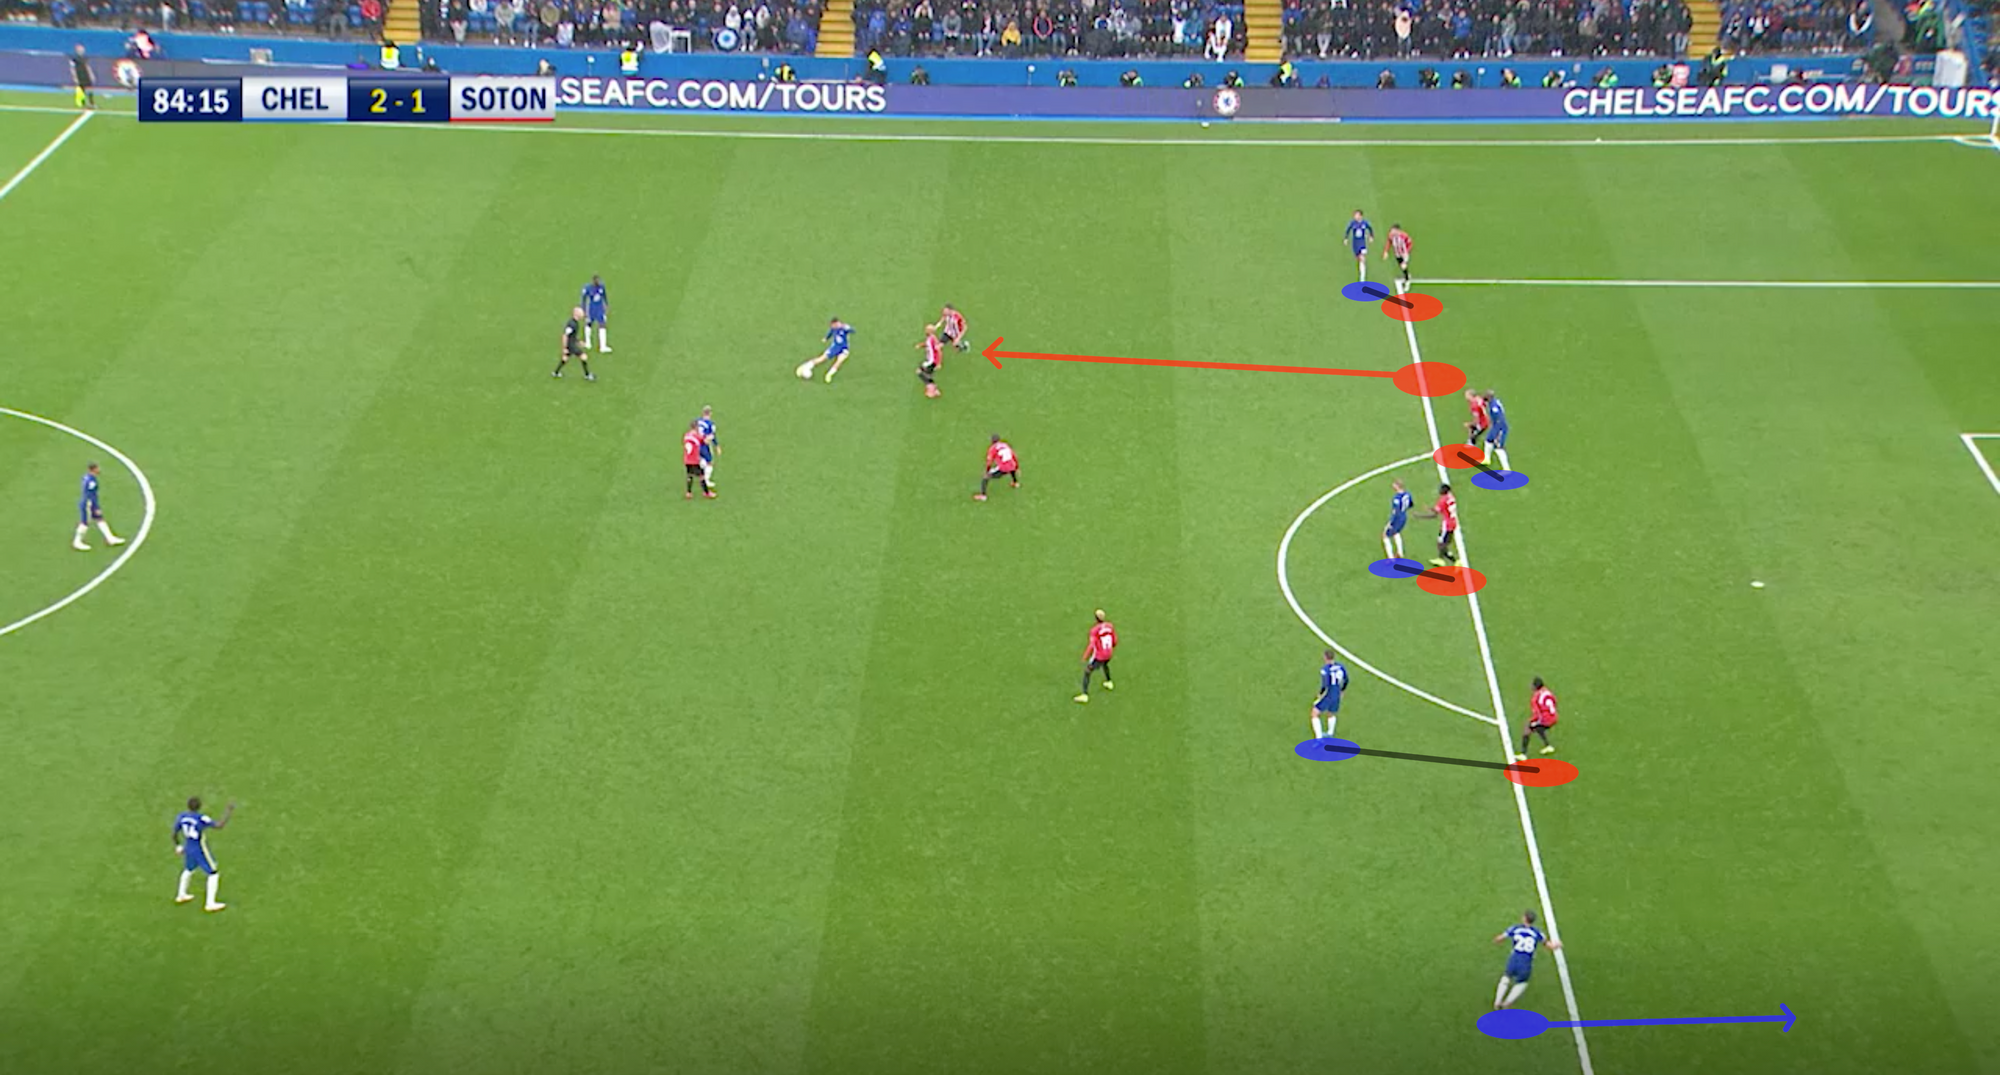
This strategy was also effective to ask questions to Saint's wingers. Nathan Tella tracked Chalobah high up on the pitch, but this freed Azpilicueta, who was able to receive the ball after the first line of pressure was circumvented by Chelsea. Tella running after Azpilicueta on the right flank was a recurring issue in the first half.
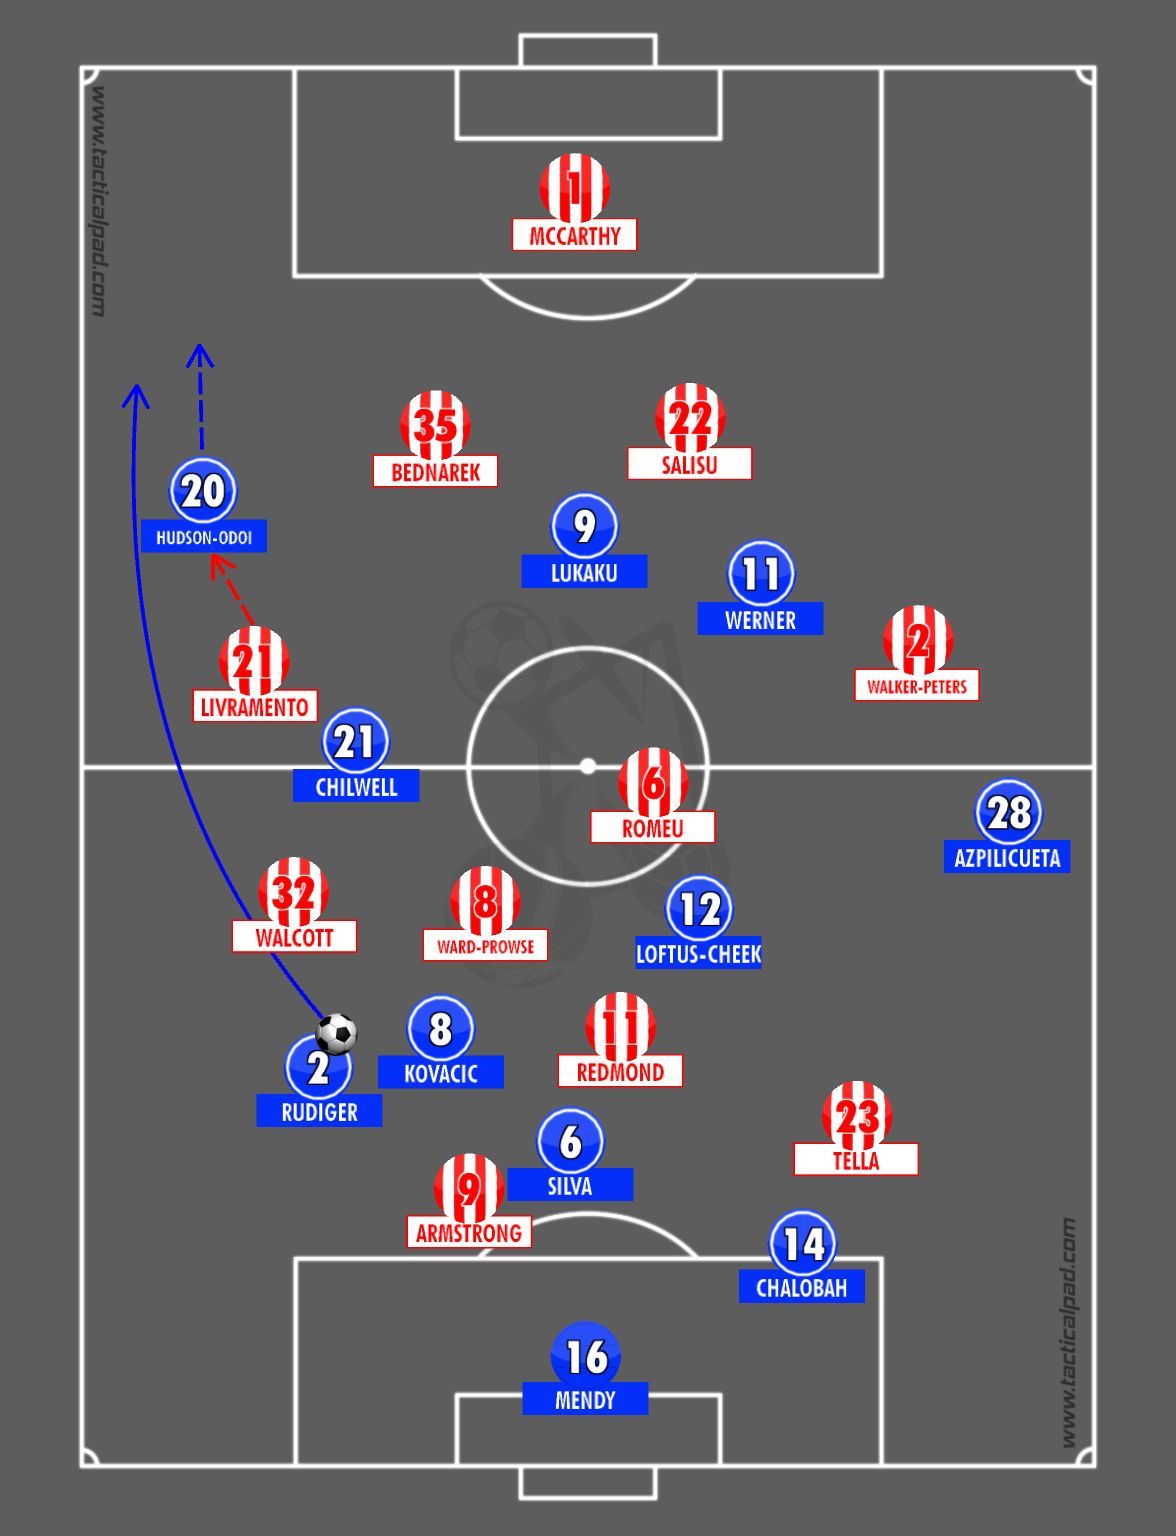
On the left side, Chilwell and Hudson-Odoi linked up a few times. Rudiger attracted Theo Walcott's pressure with the ex-Leicester underlapping to drag Valentino Livramento out of position and free the space where the wide forward would run into. Unluckily, the German defender overhit the pass towards his teammate.
With the one-man advantage, and with Southampton mirroring Chelsea's 5-3-2 defensive system, Tuchel subbed Mason Mount in to bolster the midfield, exploit the central channel and the space between the lines in the final third.
After the introduction of the English international, who was joined by Barkley and Jorginho. later on, Chelsea shifted to a 3-man midfield.
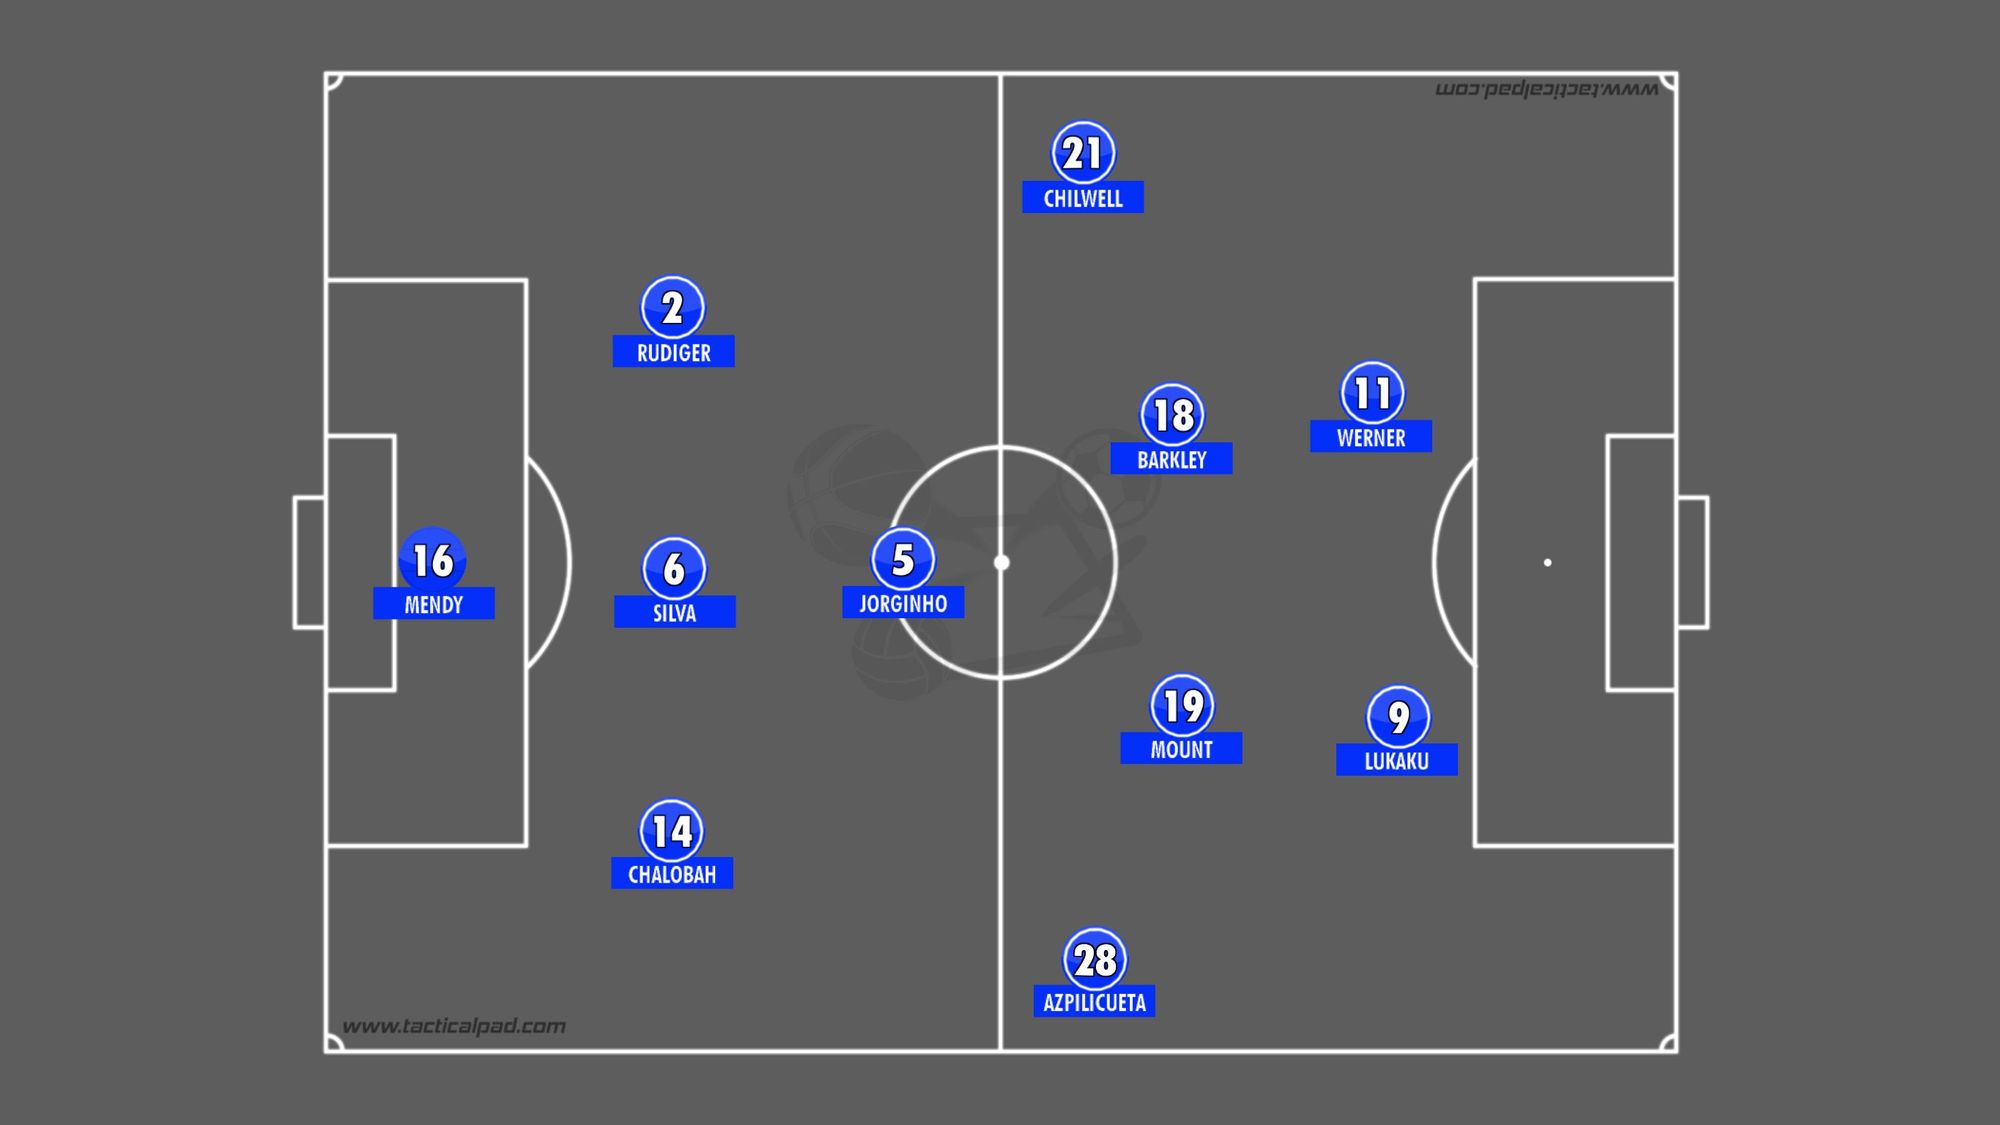
Mount and Barkley had more room to exploit the half-spaces, play between the lines and link up with the wing-backs. With the one-man deficit, Southampton's defensive coverage wasn't so effective anymore.
And it was the two midfielders introduced in the second half and the wing-backs to combine for the winning goals. Barkley assisted Azpilicueta who squared the ball for Werner for the 2-1, then Chilwell picked a ball squared in from Mount on the occasion of the 3-1.
⛔ Out Of Possession
The host played in a 5–2–3 out of possession with the wing-backs dropping deeper alongside the back three.
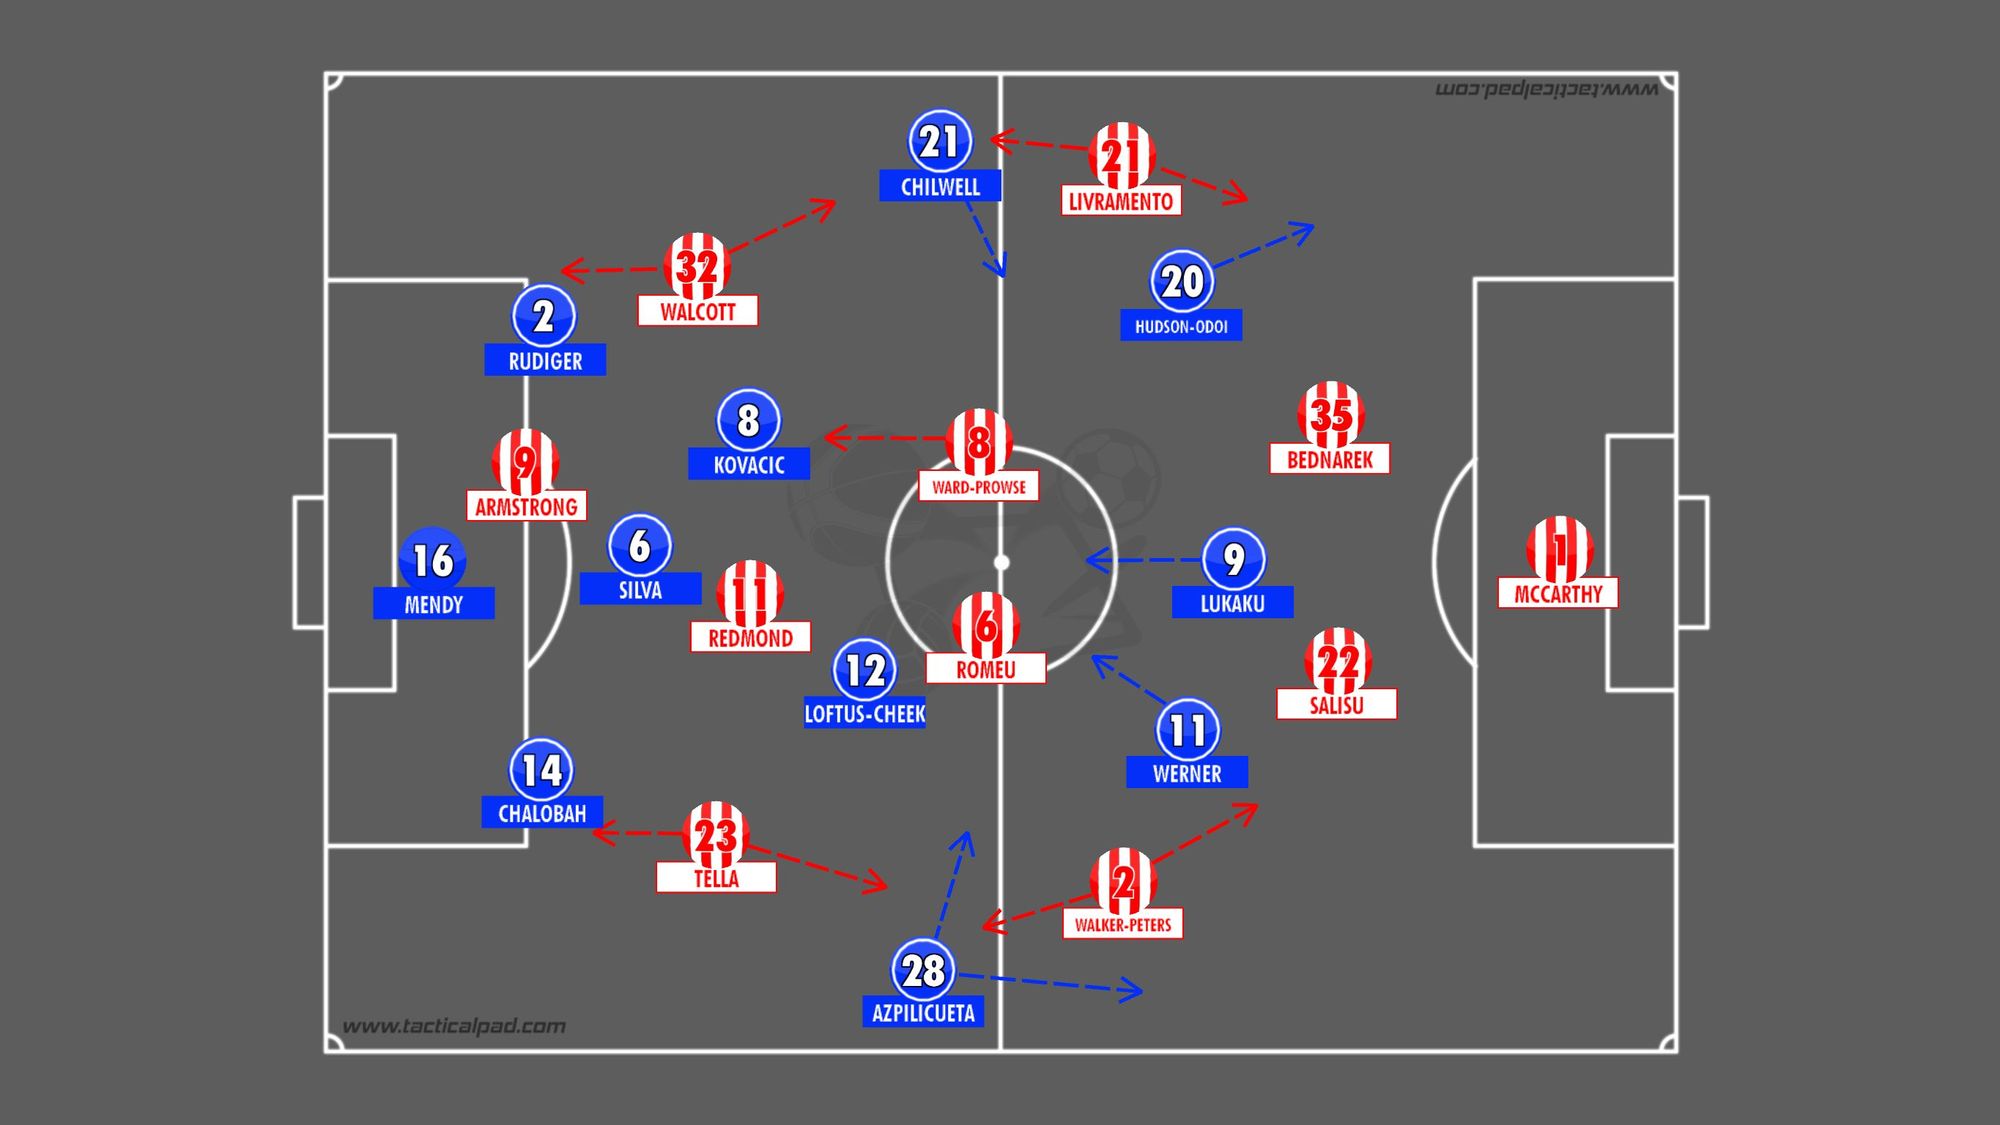
Southampton started in a 4-4-2 system, ready to shift to a more offensive 4-2-4 with Theo Walcott and Tella joining the attacking line. Ward-Prowse, usually caught high by Kovacic, dropped deep to initiate the build-up, link up with Nathan Redmond, also dropping deep, to receive the ball and offload it to the flanks.
The Saints weren't particularly dangerous in the first half.
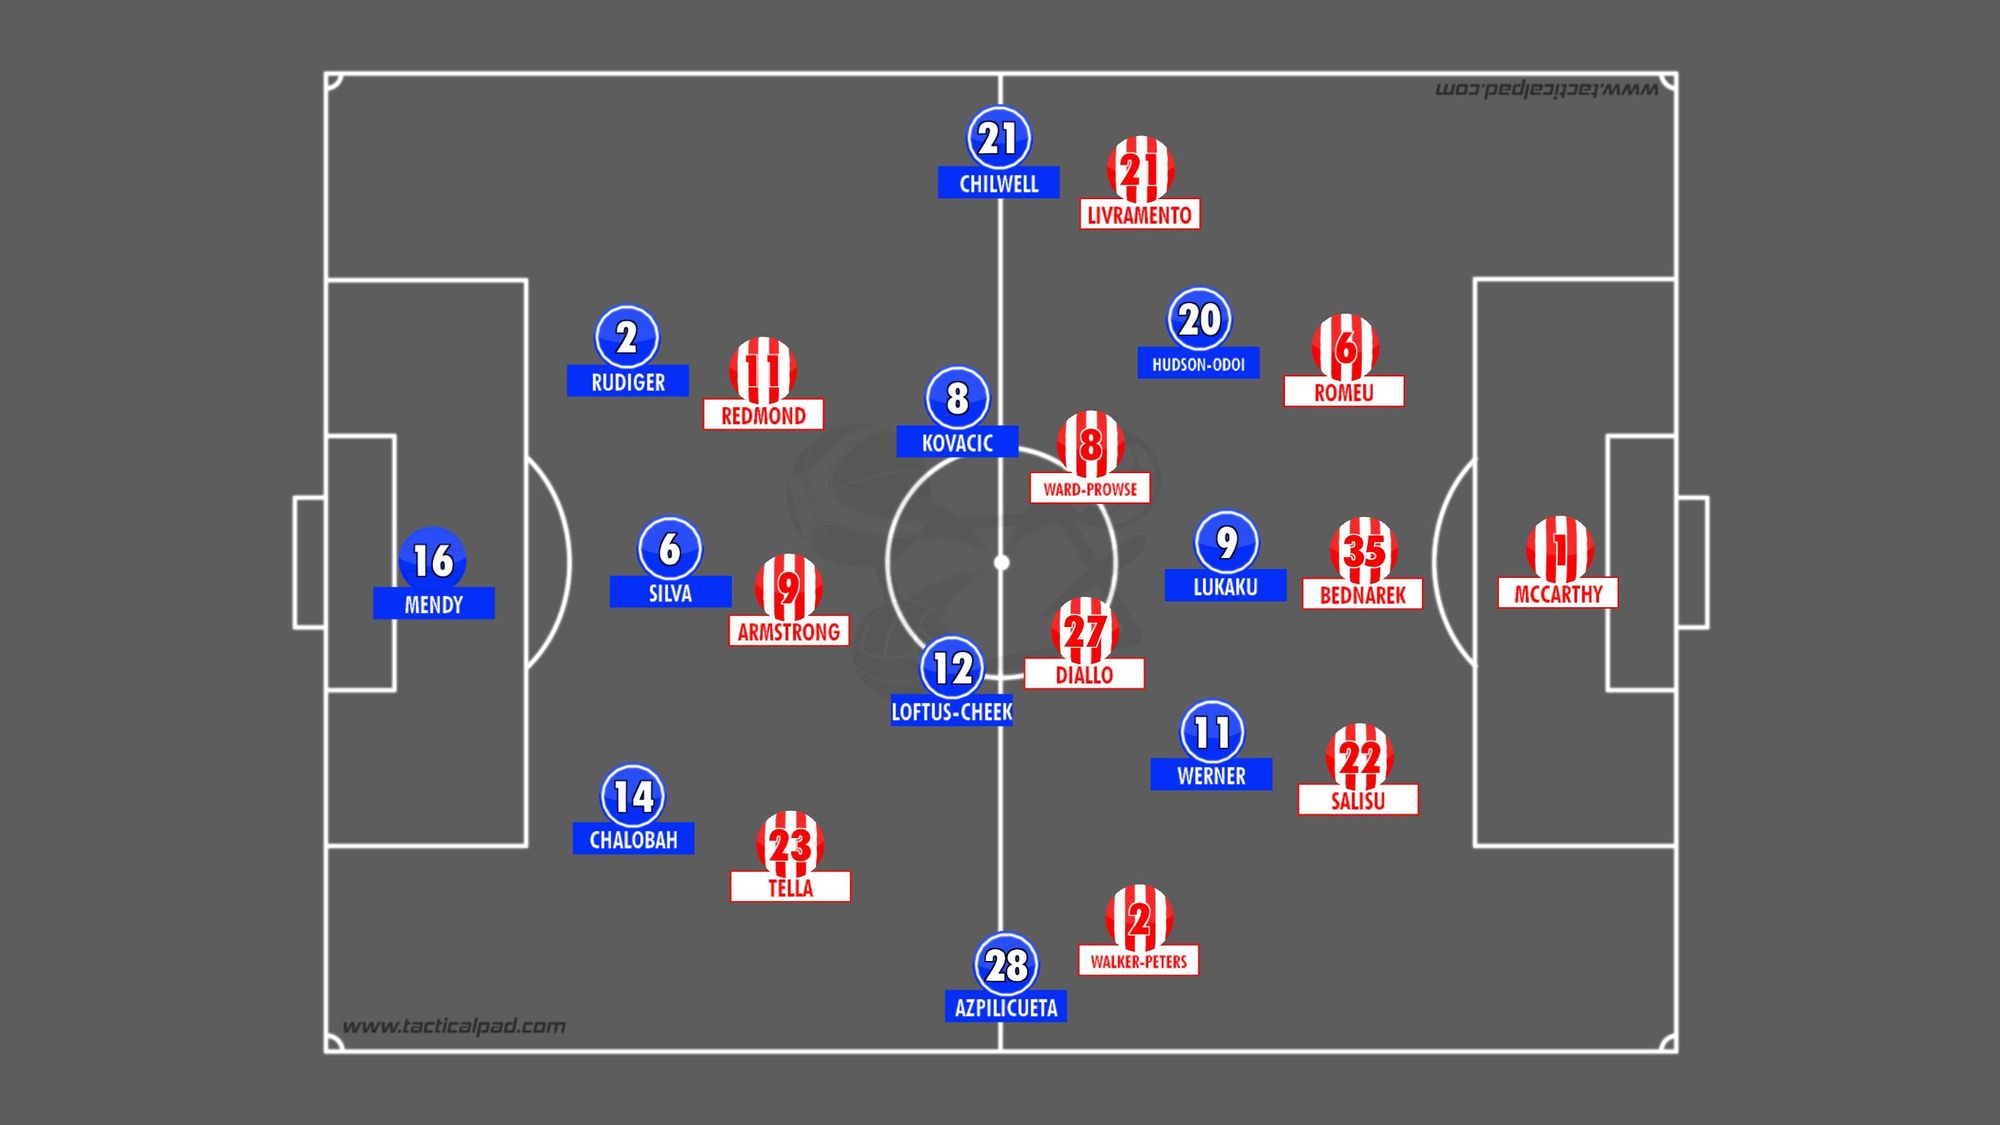
After the break, Hasenhuttl decided to reduce the hosts' advantage on the flanks by mirroring Chelsea's 5-2-3 with Ibrahima Diallo beside Ward-Prowse and three at the back, with Oriol Romeu joining the other two centre-backs.
The Saints showed more urgency at the beginning of the second half, and they were eventually awarded a penalty which Ward-Prowse converted for the equaliser. However, with less than 15 mins to go, Southampton's captain was sent off. The Saints retreated to 5-3-1, and Chelsea attacked for the remaining part of the contest until they found the winner.
🔑 Key Factors
Chelsea's centre-backs' ability to move the ball quickly and exploit the overload on the flanks was a factor in the first half. Plan-b of going long to Lukaku was also a valid option for the Belgian was well supported by teammates to receive the ball and link-up.
Southampton tried to solve the conundrum of how to track Chelsea's wing-backs while committing to the high press by mirroring the hosts' system. The Saints were off to a decent start of the period, but Ward-Prowse's dismissal changed the game in Chelsea's favour.
Tuchel re-adapted the midfield and brought in Mount and Barkley to act between the lines, receive the ball on the half-turn and drag defenders out of position, thus freeing space for the wing-backs.
This was the decisive move that eventually broke the visitor's defensive line and awaeded Chelsea with a 3-1 win.
Lineups:
Chelsea: 16.Mendy, 14.Chalobah, 6.Silva, 2.Rudiger, 28.Azpilicueta, 12.Loftus-Cheek (18.Barkley), 8.Kovacic (5.Jorginho), 21.Chilwell, 11.Werner, 9.Lukaku, 20.Hudson-Odoi (19.Mount)
Southampton: 1.McCarthy, 2.Walker-Peters, 22.Salisu, 35.Bednarek, 21.Livramento, 23.Tella (19.Djenepo), 6.Romeu, 8.Ward-Prowse, 32.Walcott (27.Diallo), 11.Redmond (24.Elyounoussi), 9.Armstrong